
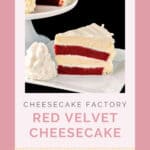
The Cheesecake Factory Red Velvet Cake Cheesecake is the ultimate red velvet cake cheesecake. It is perfect for special occasions like Christmas, Valentine’s Day, or any time you want to treat the cheesecake lovers in your life.
This post contains affiliate links. As an Amazon Associate, I earn from qualifying purchases.
Table of Contents
Why this is the copycat recipe for Cheesecake Factory Red Velvet Cheesecake you must try.
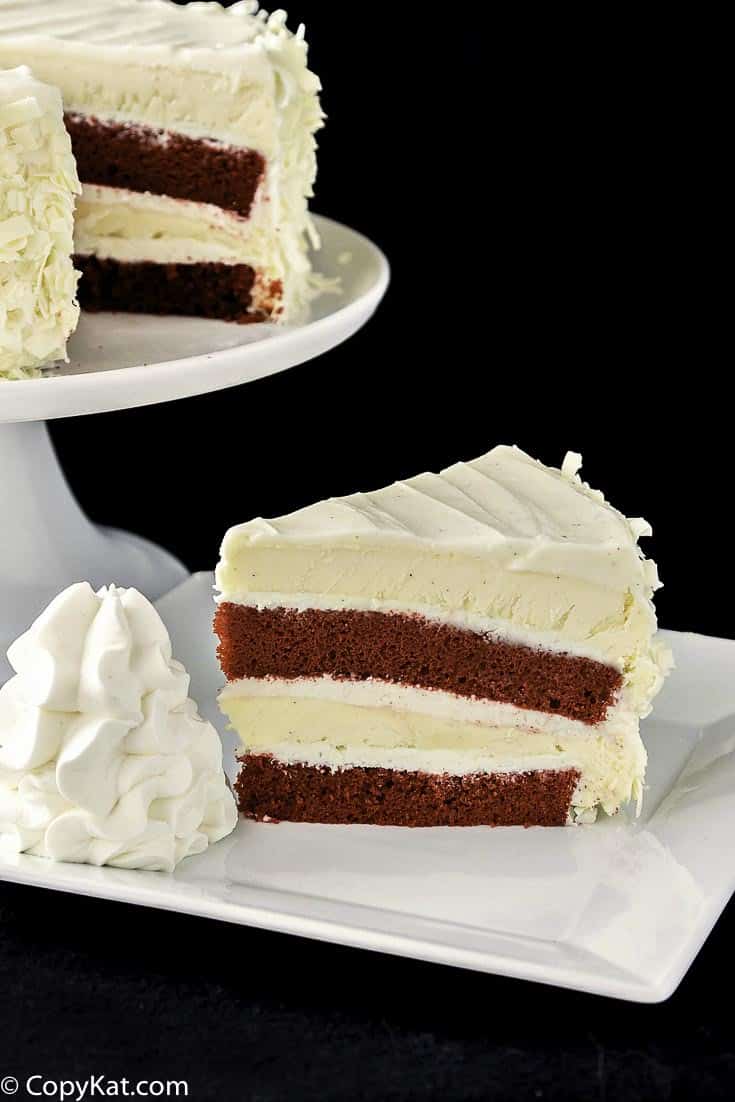
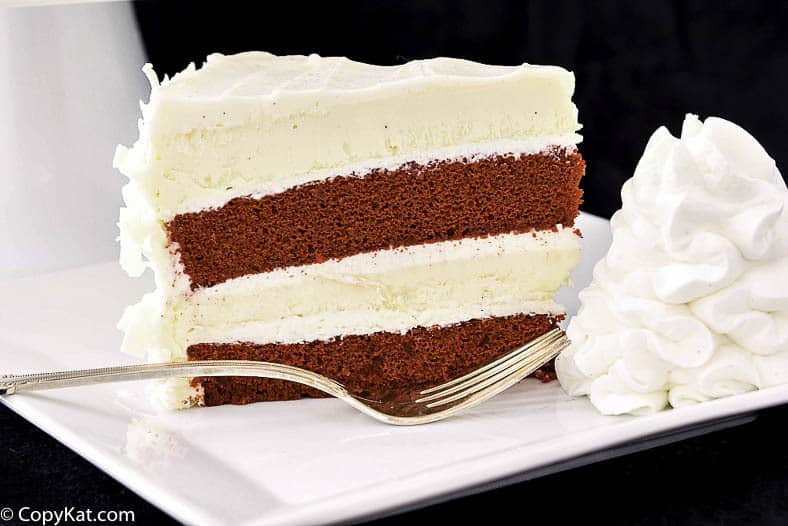
Many copycat recipes online have the wrong layers. They have a cheesecake layer nestled between two moist red velvet cake layers. This is not how the Cheesecake Factory restaurant serves its cheesecake. It is served with two layers of cheesecake and two layers of cake.
Now to make this happen you may need to purchase a kitchen scale so you equally measure out the cheesecake batter evenly. I personally love my Escali Kitchen Scale. I used this one in cooking school. It is super easy to use and can take a lot of use.
What makes the Cheesecake Factory cheesecake so good?
Moist layers of Red Velvet Cake and our Original Cheesecake covered with our special Cheesecake Factory cream cheese icing. One bite of this delectable red velvet cheesecake and you will be amazed at the flavor combination. Rich chocolate cake and creamy cheesecake are a combination that was made in heaven.
The Cheesecake Factory cheesecakes are all simply delicious. They serve the right balance of sweetness and tartness. It is hard to beat the variety of flavors the Cheesecake Factory Cheesecakes are made. You are bound to find one that you will love.
This is not a difficult recipe to make, but it does require some planning and some time. Read through all the ingredients and instructions to find out how to make Cheesecake Factory Red Velvet Cheesecake.
Be sure to prepare ahead and get ready to wow your guests with this gorgeous, red and white, showstopping cheesecake. It’s a perfect dessert for the holidays and Valentine’s Day.
Red Velvet Cheesecake Ingredients
- 1 box Red Velvet Cake mix
- Water
- Sour cream
- Mayonnaise
- Large eggs at room temperature
- Kosher salt
- Vanilla extract
- Cream cheese
- Sugar
- Vanilla paste
- Heavy Cream at room temperature
- Flour
- Butter
- Bars of white chocolate
How to Make a Red Velvet Cheesecake Cake
For this recipe, we are starting with a box mix that we are adding a few extra ingredients to the base to make a rich and decadent cake you can’t resist. Here are all of the steps you will need to make this delicious Red Velvet Cheesecake.
- Preheat oven to 350 degrees F.
- Prepare the two 9-inch round cake pans, by spraying non-stick spray into the pans, then cut parchment rounds, place those into the pans, and then spray again.
- In a large bowl combine cake mix, water, sour cream, mayonnaise, 3 eggs, 1 egg yolk, salt, and vanilla. Use an electric mixer to mix the cake. Be sure to scrape down the sides of the bowl with a spatula so all of the batter is mixed well.
- Pour the cake batter between the pans as evenly as you can.
- Place the two pans in the center of the preheated oven and bake for 22 to 25 minutes.
- Allow the cake to cook in the pans for 15 minutes before you invert the pans and cool the cakes on a wire rack.
- When the cakes have cooled, level with a serrated knife.
- Wrap the cakes in plastic wrap and refrigerate the cakes.
- For the cheesecake adjust your oven racks placing one in the top third, and one in the lower third rack of the oven.
- Preheat the oven to 300 degrees F.
- Prepare the two 9-inch round cake pans, by spraying non-stick spray into the pans, then cut parchment rounds, place those into the pans, and then spray again. (don’t skip the parchment paper, this is needed to make sure the cheesecake comes out of the pan.)
- Bring 2 quarts of water to boil, you will use this for a water bath to make the cheesecake.
- In a large bowl combine cream cheese, and mix with a hand mixer until it is smooth. Then add eggs one at a time beating well after each addition, be sure to scrape the sides of the bowl as needed.
- Whisk the cream and flour together so there are no lumps, and beat the cream mixture into the cream cheese.
- Pour half of the batter into each pan.
- Place one 9-inch round onto a rimmed baking sheet. Add hot water to the rimmed baking sheet. Repeat with the other round 9-inch pan and another rimmed baking sheet.
- Place one rimmed baking sheet carefully onto the top rack, and one on the bottom rack.
- Bake for 20 minutes. Then carefully rotate the top baking sheet to the bottom rack, and move the rimmed baking sheet that was on the bottom to the top.
- Bake for an additional 10 minutes.
- Turn the heat off. Open the door for a few seconds to allow some heat to escape. Then close the door.
- Allow the cakes to remain in the cooling oven for an additional 30 minutes.
- Crack the oven door open and let sit for an additional 30 minutes.
- Remove to racks and run a thin spatula around the inside of each pan to make sure the cakes have released from the sides.
- Cool completely, and then chill in the refrigerator for at least 4 hours or overnight. When cooled, turn the cheesecakes out onto parchment-lined lined racks. Place the lined rack on top of the pan, invert both, and give a firm rap on the counter. The cheesecake should release from the pan with no problem.
- Pick the platter that you want to serve the cake on, it’s best to assemble it there so you don’t have to move it.
- Use a vegetable peeler to shave the sides of the bars of white chocolate to make the white chocolate curls.
- Refrigerate the white chocolate curls.
- In a large bowl combine cream cheese, butter, Kosher salt, and paste. Mix well with a hand mixer. Add powdered sugar in one cup at a time, then add the heavy cream. Continue to beat until smooth.
- Place a tablespoon of frosting in the center of your platter and then press one of the cake rounds down into it, making sure to center the cake.
- Spread 3⁄4 cup of frosting evenly over the cake layer.
- Place one of the frozen cheesecake rounds onto the frosting and press down lightly.
- Frost with an additional 3⁄4 cup of frosting.
- Place the other cake round on top of the frosting and press down gently. Top with another 3⁄4 cup of frosting and then finish with the last frozen round of cheesecake.
- Scrape the rest of the frosting out onto the top of the cake. Spread it out into an even layer and then spread the excess that extends over the edge of the cake thinly around the sides.
- Use an offset spatula to make a simple zigzag design in the frosting on the top of the cake. Press the white chocolate shavings liberally around the sides of the cake.
Since the contrast between the red cake and pale cheesecake is so striking, it will look best if each layer is the same thickness. If you don’t own a kitchen scale, consider getting one so you can weigh the batters to divide them exactly in half.
For example, the cheesecake batter weighed 39 ounces, so I knew needed 19.5 ounces of batter in each pan. Your batter will most likely weigh the same as mine, but weigh it just to make sure.
How do you get the cheesecake and the cake layers to be the same thickness?
You can use a kitchen scale to make sure you pour the same amount of batter into each pan. You may need to level off the cake with a knife in case it makes a small dome.
What’s the best frosting for Red Velvet Cheesecake Cake?
Cream cheese frosting is the best type of frosting to use. It is creamy, sweet, and tangy, and it’s perfect for a cheesecake.
How do you store this Red Velvet Cheesecake Recipe?
You must store this cake in your refrigerator. Be sure to cover it with a cake dome. This will last for about one week in your refrigerator. To keep the sides of the cake moist, be sure to press plastic wrap onto the cut portion of the cake.
Does this freeze well?
This cheese freezes moderately well. Since so much of the cake is soft it may not retain its shape very well if you freeze individual slices. It freezes ok if you freeze the whole cheesecake for up to a month before you enjoy the cake.
I hope you give this recipe a try for this amazing Cheesecake Factory Red Velvet Cheesecake! It is a cheesecake that will wow all of your guests! This is one of those delicious cakes that everyone is going to remember it is a beautiful cake and one that tastes so good.
Do you love The Cheesecake Factory? Be sure to check out these copycat recipes
- Original Cheesecake Recipe
- Oreo Cheesecake Recipe
- Chicken Piccata Pasta Recipe
- Chicken Madiera Recipe
Popular Cheesecake Recipes
- Easy Brownie Bottom Cheesecake
- Peach Cream Cheesecake
- Cheesecake Buttercream Recipe
- Cheesecake Bars
- Olive Garden Cheesecake – Pumpkin
- Lindy’s Cheesecake NYC
- Tiramisu Cheesecake Recipe
- New York Style Cheesecake
- Mandarin Orange Cheesecake
Take a look at more of my easy dessert recipes and the best casual dining restaurant copycat recipes.
This recipe is from Jenni Field, her blog is the Pastry Chef Online, be sure to check out her recipes over at her blog.
Cheesecake Factory Red Velvet Cheesecake
Ingredients
Cake Ingredients
- 15.25 ounces Duncan Hines Red Velvet Cake Mix
- 3/4 cup water
- 1/4 cup sour cream
- 1/2 cup mayonnaise
- 3 eggs
- 1 egg yolk
- 1/4 teaspoon kosher salt
- 1/4 teaspoon vanilla extract
Cheesecake Ingredients
- 24 ounes cream cheese softened
- 3/4 cup granulated sugar
- 1 1/2 teaspoons teaspoons vanilla paste or extract
- 1/4 teaspoon kosher salt
- 3 eggs, at room temperature large
- 1/4 cup heavy cream at room temperature
- 1 tablespoon flour or cornstarch
For Cream Cheese Frosting
- 12 ounces cream cheese softened
- 4 ounces unsalted butter softened
- Heavy pinch kosher salt
- 1 teaspoon vanilla paste or extract
- 20 oz powdered sugar 5 cups
- 3-4 Tablespoons heavy cream
- 1 to 1 1/2 4 oz bars of real white chocolate (not candy coating)
Instructions
Cake Instructions
- To Make the Cake Preheat oven to 350F. Spray 2 9” cake pans with pan spray. Line the bottoms with rounds of parchment and spray again. Set aside. In a large bowl, combine the cake mix, water, sour cream, mayonnaise, eggs, and yolk, salt, and vanilla. Using a hand mixer, mix on low speed for about 30 seconds. Scrape the bowl. Increase speed to medium and beat for 2 minutes. Divide the batter evenly between the two pans and bake in the center of the oven for 22-25 minutes, or until the tops spring back when lightly pressed, and the cakes are just starting to pull away from the sides of the pan. Allow to cool in pans for 15 minutes and then invert onto cooling racks. Invert again, so cakes cool right-side up. Note, the cakes will dome quite a bit. Once cool, use a large serrated knife to slice off the entire cake dome as evenly as you can. You should have two even discs of cake approximately 3⁄4” thick. Wrap well and refrigerate.
Cheesecake Instructions
- For the Cheesecake Place racks in the upper and lower thirds of the oven. Put a rimmed baking sheet on each rack. Preheat the oven to 300F. Spray 2 9” cake pans with pan spray. Line the bottoms with rounds of parchment and spray again. Don’t skip the parchment, because you’ll be turning these out once chilled.
- Set aside. Bring 2 quarts of water to a boil. Put the cream cheese in a large bowl. Using a hand mixer, beat on medium-low speed until smooth. Add sugar, vanilla, and salt, and continue to beat until well combined and smooth. Scrape the bowl as necessary. Add the eggs, one at a time, beating well after each addition and scraping the bowl as needed. Whisk the cream and flour together, so there are no lumps. Beat this mixture evenly into the rest. Pour half of the batter into each prepared pan and smooth the tops. Pull out the top rack, place one of the cheesecakes into the rimmed baking sheet and then pour in boiling water to come up to the level of the batter, about 3⁄4”. Carefully slide the rack back in. Repeat with the other pan on the lower rack. Bake 20 minutes. Carefully rotate each pan and then continue to bake an additional 10 minutes.
- Turn the heat off, open the oven door for a few seconds to let some heat escape, and then close the oven door. Allow cakes to remain in the cooling oven an additional 30 minutes. Crack oven door open and let sit for 30 more minutes. Remove to racks and run a thin spatula around the inside of each pan to make sure the cakes have released from the sides. Cool completely, and then chill in the refrigerator for at least 4 hours or overnight. When cooled, turn cheesecakes out onto parchment-lined lined racks. Place lined rack on top of the pan, invert both and give a firm rap on the counter. The cheesecake should release from the pan with no problem. If you do have issues, set the bottom of the pan in warm water for 15 seconds and try again. Freeze the cheesecakes and then wrap well. Leave in the freezer until ready to assemble.
Cream Cheese Frosting
- For the Cream Cheese Frosting In a large bowl, use a hand mixer to beat the cream cheese and butter together until smooth. Add the salt and vanilla and continue to beat until smooth and creamy. Slowly beat in the powdered sugar, scraping the bowl as necessary. Beat in the cream, a bit at a time, until you have a nice spreading consistency.
To assemble
- To Assemble and Decorate It is easiest to assemble the cake on the stand or platter you’ll be serving it on, so make sure it is a good 12” in diameter and is nice and flat. Using a vegetable peeler, shave the sides of the bars of white chocolate to make curls. Catch them on a piece of parchment or a plate and refrigerate until needed. Place a tablespoon of frosting in the center of your platter and then press one of the cake rounds down into it, making sure to center the cake. Spread 3⁄4 cup of frosting evenly over the cake layer. Place one of the frozen cheesecake rounds onto the frosting and press down lightly. Frost with an additional 3⁄4 cup of frosting. Place the other cake round on top of the frosting and press down gently. Top with another 3⁄4 cup of frosting and then finish with the last frozen round of cheesecake. Scrape the rest of the frosting out onto the top of the cake. Spread it out into an even layer and then spread the excess that extends over the edge of the cake thinly around the sides. Use an offset spatula to make a simple zigzag design in the frosting on the top of the cake. Press the white chocolate curls liberally around the sides of the cake. Leave in the refrigerator for at least 4 hours before slicing and serving with a signature tall swirl of whipped cream.
Bobbi Zimmerman
Well, my cheesecake portion looked nothing like the picture…only half an inch high at best. I’m wondering if 8 inch rounds would be better for a higher cheesecake. All in all for the amount of time spent, it was not worth it.
Stephanie Manley
I am so sorry your cheesecake did not look like what you had hoped it would look like. I worked with a trained pastry chef to develop this recipe to make sure we would get it right.
Loretta
My cheesecakes came out delicious, but they were only about 1/2 inch thick. Whereas my red velvet baked up quite high. So, when I assemble, the layers won’t be even. I’m thinking to cut the red velvet layer to make it thinner, but not sure yet. Either way, it’s a great recipe! I’m going to assemble this afternoon, so we will see what the final product looks like.
Any tips on the flat cheesecake will be greatly appreciated.
Stephanie Manley
Off the top of my head, perhaps the eggs weren’t super fresh. They provide the leavening agent for the cheesecake. I would level my red velvet cakes to put this together, or simply work with what you have. I don’t think most people who consume the cake will notice.
Loretta
Thanks! It came out great. I left the Red Velvet layers as they were. I used baklng bands/cake strips. They work great for regular cake (nice and level). Maybe not such a good idea for cheesecake. I quickly googled it to see if I should use them or not, but next time I”ll leave them off and see what happens. My oldest son requested the same cake for his birthday just after Christmas.
Thanks for responding and for an awesome recipe. I’m officially a rockstar!
Stephanie Manley
I am so glad it worked well for you!
Vicki Johnson
Made for my nephew’s-birthday. Great success.
Latifa
This looks amazing! I plan on making this this weekend. I just have a question – for the heavy cream, what percentage did you use? And is it heavy whipping cream or regular heavy cream?
Stephanie
I used heavy whipping cream.
Bobbie
I believe there is actually a cheesecake mousse layer in the Cheesecake Factory’s version so I added that between the red velvet layers and cheesecake, and then the frosting on top of the cheesecake. I also added white chocolate shavings on the top and sides. Made it for myself for Mother’s Day and it was worth all the time and effort! Thanks for this recipe. It was my best attempt at the real thing!
Rosa
How did yo do the cheesecake mousse?
Thank you
Christin
My favorite is cream cheese white chocolate mousse.
8 oz cream cheese
8 oz white baking chocolate (2 bars) melted
8 oz cool whip
Beat cream cheese until smooth.
Slowly pour in melted chocolate on low speed. Mix until smooth and incorporated.
Fold in whipped cream.
Amazing!!!
Yelena Z.
Good looking, fresh without any decoration, rich in flavor yet not too sweet, this red velvet ranks#1 among all brands of cheesecakes, this is surely appear more in my parties!
Ennovy
The frosting taste better than the cake itself, it did not balance out also the frosting was way too runny and I followed the recipe to the T. Im glad I started with this recipe first because it won’t be one I end it with in the future.
John R
I will confess that I’ve never had The Cheesecake Factory’s version but my GF made this the other day and it was stupendous! We brought it to a get together for her son’s bday and it got rave reviews.
Yes it’s a very involved process but she followed the recipe to the letter and the results justified the effort.
Alex
Hi there,
I love your website. I live outside the US and cannot visit the restaurants so often. I want to bake your cheesecake and I am wondering what the mayonnaise in your recipe exactly is. Mayonnaise is my region is something made out of eggs, oil, vinegar, salt, pepper and we eat it with potatoes, pasta, as sandwich cream etc. So I cannot imagine that our mayonnaise works for your cake. Can you maybe tell me the ingredients of your mayonnaise or name a product or provide a link?
Thanks a lot.
Alex
M
Hello,
I made this recipe 2 weekends ago and it turned out PERFECT!! Only difference was I did not allow the cheesecakes to freeze prior to assembling them. I put them in the fridge for close to 5 hours (turned the fridge setting up higher to make the fridge a little cooler for a few hours) and then assembled them after. This recipe made me look like a professional to my family & friends! I also threw some leftover slices in the freezer for a week and took them out to eat a week laster & they tasted just as good! I will be making this cheesecake again. Thanks!
Stephanie
I am so glad this recipe turned out well for you.
julie
could I do these in to individual ones like a cupcake size?
Sunflower
Do you have to freeze the cheesecake layers before assembling? Or can you leave cakes and cheesecakes in the fridge overnight and then frost the next day? My red velvet cakes are in the fridge right now and the cheesecakes are cooling in the oven.
Stephanie
I think your suggestion would work well.
Whitney
Considering the amount of time it would take (for cooking, preparation and clean-up) and the amount of money it would cost for ingredients, you might as well just purchase one from the restaurant. They do cost like 75-80$ but mmm mm mmm-my god, they’re worth every penny!! I’d just buy it by the slice. It’s too rich to have more than one piece anyway.
Cat
There’s no way I’d pay $75-$80 for a cake. All this is is one cake and two cheesecakes and done frosting. Easy peasy! Thanks for the recipe. I’m going to make this for Thanksgiving.
Cat
“Some” frosting that is. Oops!
Pat Nugent
Where do you live that it costs that much $ for a cheesecake. They are not that much in NYC! Not even close.
John R
Visit a Cheesecake Factory. My understanding is that $89 (give or take…) is the going price for a whole cake.
Alasha
Online for NYC Juniors red velvet cheesecake is $49, If you go to actual Times Square it is $36 for the 8 inch round. But if you order from QVC, or Harry and David online, and not directly from Juniors site it’s expensive from $69-$75
Nicole
I’m not into cheese cake, but this looks so good
Jenni
It’s hard to beat that red and white contrast! Add some blueberries, and it’d be perfect for the 4th! =)
Linda
when making the crust, do you include the filling from the oreo’s or just the cookie portion?
Jenni
I’m not sure if you left this comment on the right post, Linda. There are no OREOs in this recipe. In general, if I use OREOs to make a crust for a cheesecake (or whatever), I leave the filling in and just reduce the amount of butter I add to the crumbs for the crust. Hope that helps. 🙂